Feeling a little disappointed with myself for giving in to sleep last night, when I got home from work I started once again. First, of course, I visited my local grocery store and grabbed a tube of super glue so I could attach that darned belt to the extruder assembly. After allowing about 30 minutes to cure I tested the X, Y and Z motion and everything checked out well. Time to start calibrating and leveling the printer.
Leveling frustrations
I spent nearly an hour trying to level the bed, mostly without success. After tightening the right side down as far as it would go and then loosening the nuts on the left side, I could not get the print bed level because the nuts on the left would fall off first. Eventually I found an actual level and put it across the handle on the top of the printer and discovered it was basically level, but the X-Gantry was not. Reading online I discovered what I had already figured out; being made of wood and supported by a lead screw on the left side only, the X-Gantry has a long moment arm and sags badly (2-3mm) when the print head is at the far end.
Through further experimentation I discovered that I could get about 50-70mm of “mostly level” work space on the left side of the print bed. All I had to do was tighten the right side down as far as possible, and loosen the nuts on the left side to the furthest extent that kept the nut (and the print bed) in place. Tomorrow I can pick up some longer screws and compression springs, but today I would like to do some real printing.
Calibrating woes
I searched on thingiverse for some calibration objects. Following advice that I had found on other blogs I chose a 20mm hollow cube. The cube is the perfect object for rough calibration. The straight vertical sides let you see bulging from extruding too much filament, or gaps from too little filament. The uniform shape allows you to measure the generated object to calculate how close your X, Y and Z-index scaling is to the correct size and make adjustments. Finally, by looking at the top of the cube you can see how well the printer can bridge over an empty space.
I loaded the 20mm cube into Repetier-Host, sliced it with Slic3r and pressed the Print button. The head jumped to life, moved up about 5mm up, and then sat and worried the heck out of me for about 10 seconds while it heated up. Finally the head lowered to the print bed and dug into the melamine faster than I could hit the Emergency Stop. Luckily the default in Repetier-Host is to center the object so the print site was outside my level work space. Following other advice I had found on blogs I covered the print surface, and the gouge, with painters tape and re-zeroed my print head.
The next print was better, I got an object, let’s call it a cube. At the bottom of the cube there was a noticeable lip, and the top looked more like tissue than a solid surface, but it did work. I had finally printed something in 3D.
So Many Cubes
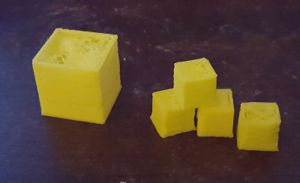 For the next couple of hours I adjusted settings. Being inherently cheap, and in a hurry, I scaled the object down to a 10mm cube, which decreased my print time from 25 to 3 minutes. Later I discovered why that was a mistake, but that is a different story.
So I increased the temperature from the default and the tops of my cubes started looking like those melted clocks Salvador Dali liked so much. I lowered the temperature and had issues getting the extrudate to adhere to the print bed, which inevitably led to a gooey yellow blob stuck to my print head that required cleaning. I raised the temperature 5°C and lowered my printer speed to 20mm/s and the object almost looked like a cube.
Happy with the basic appearance of the cube I started to concentrate on other issues. I decreased the flow rate and the lip at the bottom started to look better, but I could see through the sides. I raised the flow rate to about half of the original change, and the lip came back, plus the sides still looked somewhat transparent. I then got the bright idea to just raise the print head about 50 microns and increased the flow rate closer to 100%.
Suddenly I had a respectable cube, with acceptable proportions .. but a tissue paper top. Time for bed again…
Leave a Reply